Ever stepped into a shower only to find water seeping through cracks or tiles popping loose? Shower screeding sets the foundation for a watertight, stable bathroom, but get it wrong and you face leaks, mold, or costly repairs. In Australia, where humid coasts and dry interiors test home builds, proper shower screeding keeps your space dry and safe. This guide uncovers common shower screeding mistakes that lead to disasters, plus tips to avoid them, with local insights for lasting results.
Understanding Shower Screeding and Its Importance
Shower screeding involves applying a layer of mortar or cement mix to create a sloped base in your shower area. This directs water toward the drain, preventing pooling and damage to floors or walls. For Australian bathrooms, shower screeding forms the base for tiling, ensuring waterproofing holds up against our variable weather—from steamy Queensland mornings to chilly Tasmanian winters.
Done right, shower screeding supports tiles securely, reducing slip risks and mold growth. It integrates with waterproof membranes, a key step in modern renos. Skipping or messing up shower screeding invites water to seep under tiles, rotting joists or weakening structures over time.
In home upgrades, shower screeding transforms basic wet areas into reliable retreats, fitting our love for quick showers after beach days or workouts.
Why Shower Screeding Matters for Waterproofing
Shower screeding creates the pitch—usually a gentle slope—for efficient drainage. It bonds with membranes like liquid-applied coatings, sealing against moisture. In coastal homes, it combats salt-laden humidity; inland, it handles dust and dryness.

Common Shower Screeding Mistakes to Avoid
Many homeowners rush shower screeding, leading to big problems. One major error is ignoring the slope—flat bases cause water to linger, fostering mold in grout lines. In humid Sydney bathrooms, this turns small puddles into slippery hazards or wall stains.
Another pitfall: skimping on base prep. Skipping a clean, level subfloor lets debris create uneven spots, causing tiles to crack under foot traffic. Paving contractors or tilers often see this in older homes, where uneven joists from settling amplify issues.
Using the wrong mix ranks high too. Thin mortar without enough sand or cement fails to bond, leading to loose screed that shifts with use. In Melbourne’s cooler climates, improper curing—exposing wet screed to drafts—causes shrinkage cracks, allowing water entry.
Overlooking waterproofing integration destroys setups. Applying screed without a membrane lets moisture migrate to timber frames, common in elevated Queensland homes prone to termites. Finally, poor drainage alignment misdirects water, flooding adjacent areas during heavy rains.
Examples: A Brisbane reno suffered mold after shallow screeding ignored the tropical downpours, requiring full redo. In Perth, rushed curing in dry heat led to brittle layers that crumbled under tiles.
Signs of Bad Shower Screeding
Watch for bubbling tiles, discolored grout, or musty smells—these signal underlying failures from poor shower screeding.
How to Get Shower Screeding Right Every Time
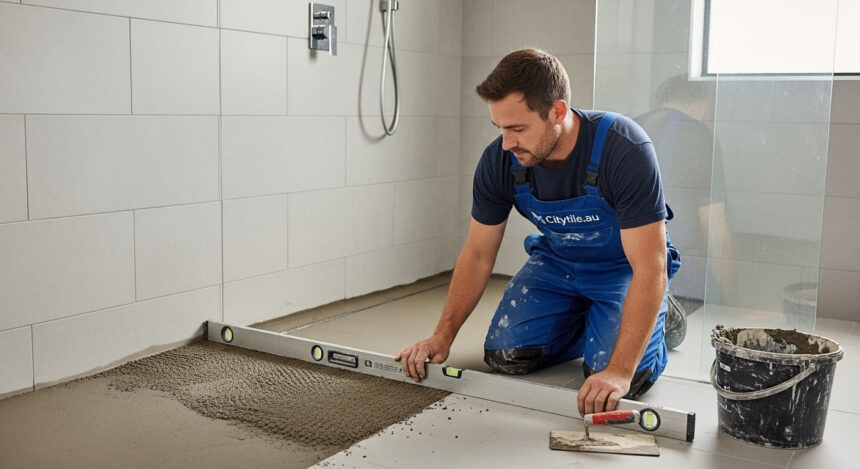
Start with planning—measure your shower base and mark the drain position for a consistent slope. Use a laser level to guide the fall, aiming for even drainage without extremes that trip users.
Prep the subfloor thoroughly: remove old materials, fill gaps, and apply a primer for adhesion. For shower screeding, mix cement with sand in a sturdy ratio, adding polymers for flexibility in seismic areas like Adelaide.
Apply in layers—build up the screed gradually, troweling smooth while wet. Integrate the waterproof membrane during this step, overlapping edges for full coverage. Allow full curing—cover with plastic in dry conditions to retain moisture, preventing fast drying cracks.
Hire pros familiar with local codes; they ensure compliance and spot issues early. In Australia, shower screeding ties into tiling for seamless waterproof zones, extending to hob or niche details.
After, test with water to check flow before tiling. This methodical approach avoids the pitfalls that ruin bathrooms.
Tools and Materials for Effective Shower Screeding
Gather these basics:
- Trowel and Level: For spreading and checking slope.
- Mixing Tub: To blend cement and additives evenly.
- Waterproof Membrane: Liquid or sheet type for sealing.
- Screed Board: Straight edge for smoothing.
- Primer and Sealant: For base grip and final protection.
These tools make shower screeding straightforward and reliable.
Local Considerations for Shower Screeding in Australia
Australia’s regions demand tailored shower screeding. In humid Darwin, use mold-resistant mixes and thick membranes to fight constant moisture. Southern states like Victoria require frost-proof materials to avoid expansion damage in cooler showers.
Regulations under the National Construction Code mandate waterproofing for wet areas, with states adding specifics—like Queensland’s focus on cyclone-resistant bonds. Providers offer compliant kits, while competitors specialize in eco-membranes from recycled sources.
Cultural habits influence designs. In multicultural Melbourne, shower screeding supports open-plan bathrooms with family-friendly slips. Indigenous homes in remote areas prioritize simple, durable setups for water conservation.
Examples: Sydney coastal baths use salt-tolerant screeds to prevent corrosion from sea air. In rural New South Wales, elevated designs with deep screeding handle flood risks.
For fire-prone zones, non-combustible options align with safety standards. Providers adapt to these, ensuring shower screeding fits local builds.
- Coastal Humidity: Extra sealing in New South Wales setups.
- Inland Dryness: Flexible mixes in South Australia to avoid brittleness.
- Urban Compliance: Code checks in Brisbane high-rises.
- Rural Durability: Reinforced bases in Tasmania for uneven floors.
These adaptations make shower screeding practical nationwide.

Questions and Answers: Common Questions About Shower Screeding in Australia
Q: What slope should shower screeding have in wet Queensland bathrooms?
Ans: Aim for a gentle fall toward the drain to guide water quickly. This prevents pooling in humid conditions, keeping tiles secure and mold-free.
Q: How does shower screeding comply with building codes in Victoria?
Ans: It requires a waterproof membrane over the screed layer. Local inspectors check for proper bonding to ensure no leaks in cooler, damp climates.
Q: Are there eco-options for shower screeding in eco-focused Perth?
Ans: Low-VOC membranes and recycled cement mixes work well. They provide strong waterproofing while suiting Western Australia’s green building trends.
Q: Can shower screeding fix uneven floors in older Sydney homes?
Ans: Yes, with careful leveling during prep. This creates a stable base for tiles, handling the city’s clay soils without future shifts.
Q: What curing time does shower screeding need in dry inland areas like Adelaide?
Ans: Keep it moist for several days to avoid cracks. Covering with damp sheets helps in arid conditions, ensuring a solid finish.
Conclusion: Your Path to a Successful Shower Screeding in Australia
Shower screeding builds a waterproof sloped base that prevents leaks and supports tiles, but mistakes like poor sloping or weak mixes lead to mold and structural woes. Avoid them by prepping thoroughly, using quality materials, and integrating membranes, all while following local codes for humid coasts or dry interiors. This guide details pitfalls, right methods, and regional tips, with examples showing shower screeding’s role in safe, stylish bathrooms that fit our family-focused, weather-tested homes.
